Hole Wall Roughness

Hole Wall Roughness Testing Method

The irregularities generated on the hole wall by the drilling process are called "hole wall roughness".
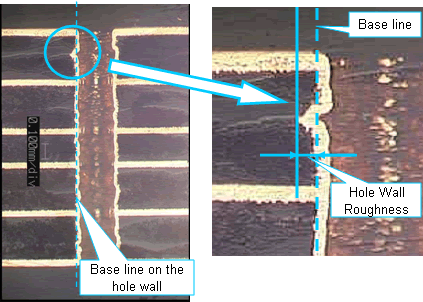
  • Hole wall roughness is measured after the plating.
  • The hole wall is inspected after cross section and the depth of the concave portion is measured from the base line as shown in the figure below.
  • When stack drilling has been used, all the PCB panels are measured.
  • The maximum roughness points are measured around final hit counts.

Cross-section

The hole wall roughness values are higher in the 45 deg. plane against the glass fiber. (A 90 deg. cross-section is gives smaller values) Hole wall roughness is measured on the full diameter point. (50% of the hole is ground back) It should be noted that the roughness varies according to the cross-sectioned point.

Reference data (350KB)

PRODUCT 01 PCB Drills / Routers / Ultra precision micro-hole drill

Other product categories

Information

CONTACT

Send product inquiries or download catalogs here.